Post processing
All estimation data in AImation Studio comes in completely raw form, during post-processing we turn this into more stable, filtered data.
After post-processing you can either export to BVH/FBX file or stream directly to an engine via WebSocket.
After which you can use motion-capture data to drive your character rigs using e.g. IK solvers, see Unreal Engine LiveLink implementation driving metahumans.
Everything that this page will talk about happens in a viewport tab for a given scene. You did select a scene when recording, if you don't have the tab open you can load it again from Recent scenes on the quickstart tab or using menu bar (File -> New-> Scene).
Scene tab consists of multiple panels, here is the default layout:
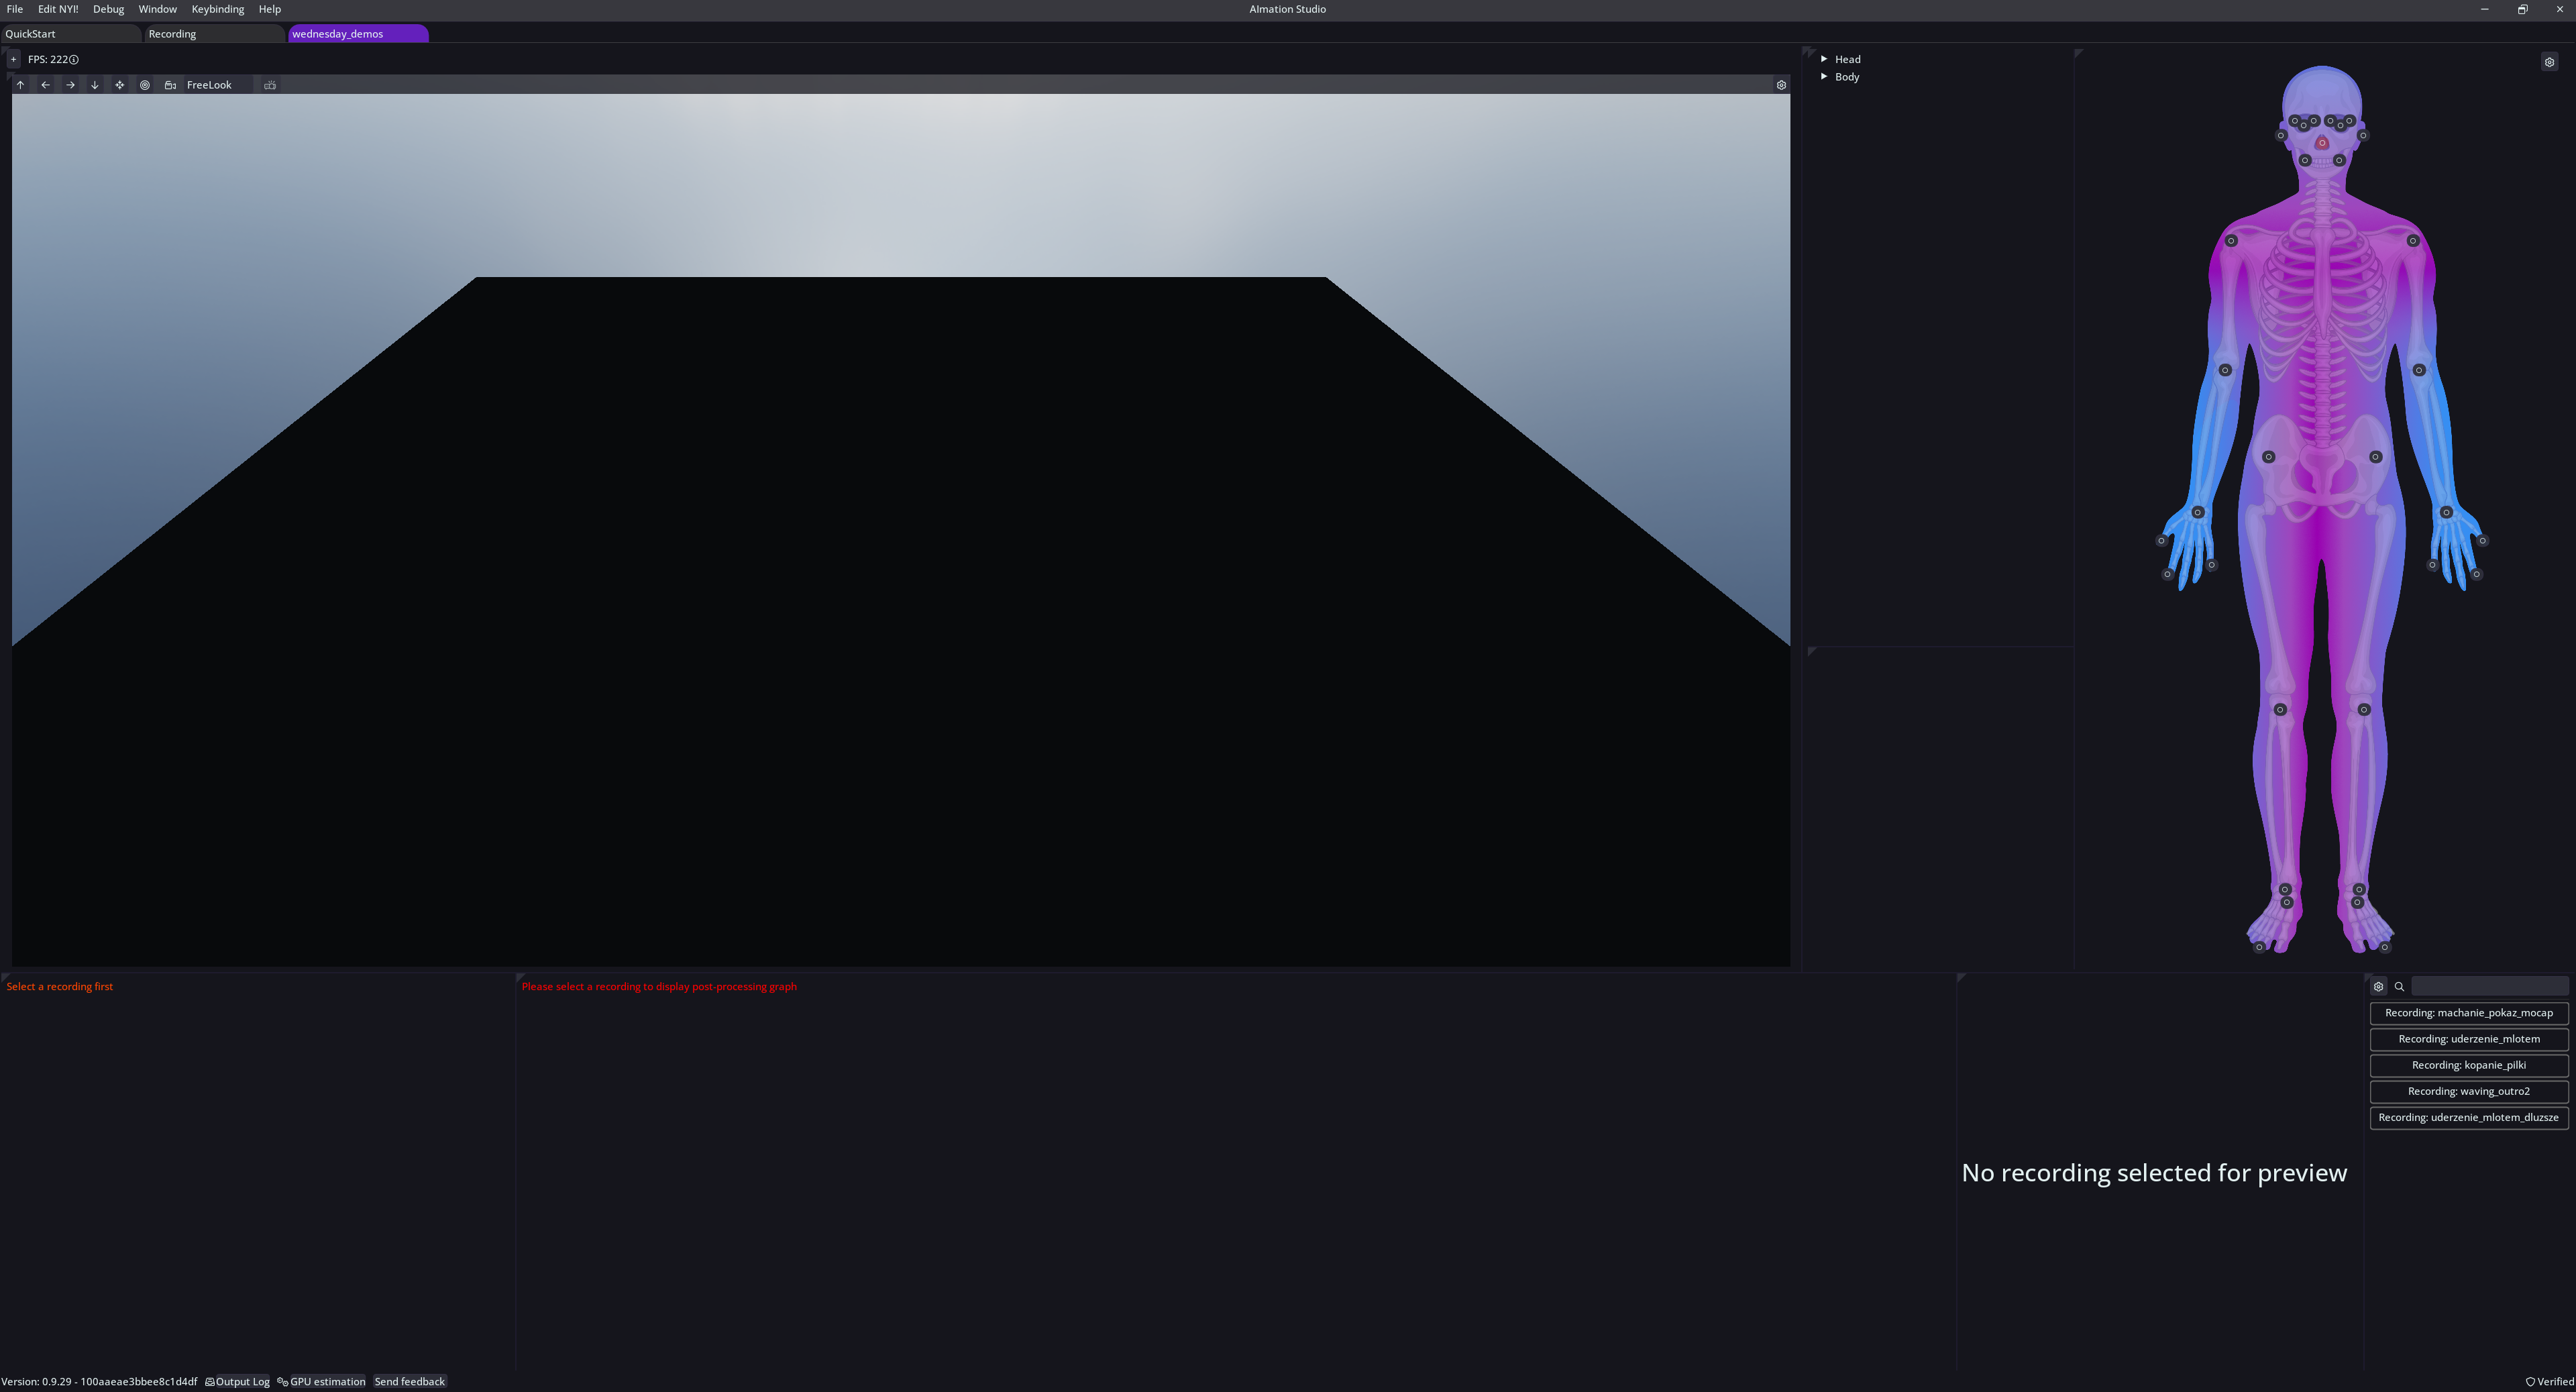
In this part of tutorial we will focus on the lower part of screen as this is where most of postprocessing happens. Of course you can move the panels around if you want.
First take a look at the reconstruction list on the right side. This contains all the recordings done for the current scene. Selecting (left-click) a recording will load its animation data from the disk, if available. Right-click on a recording to open the context menu to access management options. Selected recording displays a green border.

Track Details
This is where most of data management happens, after selecting a recording you will see the processing options, playback controls and the list of available tracks. Each track is a snippet of data representing a skeletal animation, at the beginning there is just a single track for every camera used in recording. If you did not select 'estimate right away' during the recording there will be no tracks as no processing was done yet, your recording data is for now stored as frames on disk.
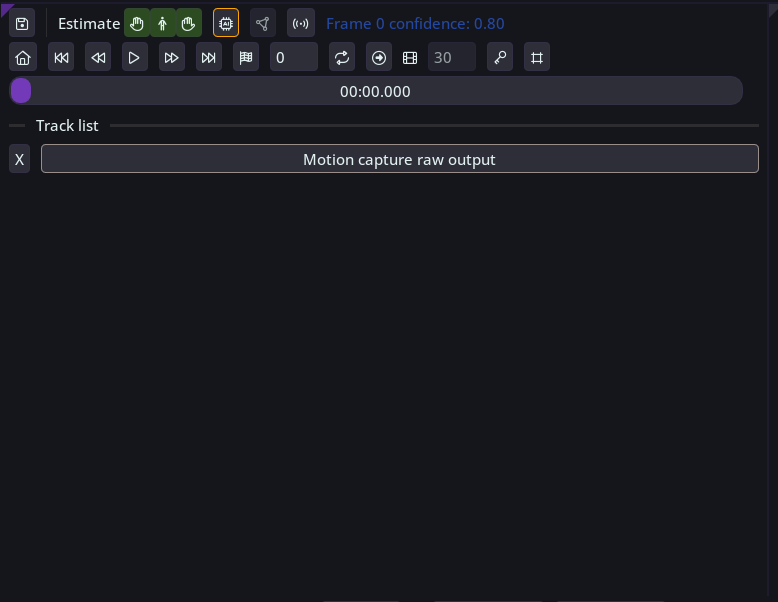
Now, let's go over the upper row of buttons and what they do:
- First you have the save button, this will light up in yellow if there are some unsaved changes in the recording. Right to it are the estimation options:
- The chip button to start the estimation, you should use it if you didn't select 'estimate right away' when recording. You can also rerun the estimation as long as the frame images are on disk.
- The triangle button to run triangulation (multi-camera setup only). This will produce new track containing data composed from all cameras according to their extrinsic data.
- Next we have the antenna button, which lets you control streaming the preview to connected integrations (like Unreal Engine).
- It is followed by the confidence score display, this tells how much the AI was sure about detections in this frame.
- The second row of buttons are playback control buttons
Track-list
As explained above, each track is a unique skeletal animation. Each recording will start with at least one raw recording which we will post-processing using nodes.
To preview a track in the viewport simply select the track (left-click), a selected track displays a white border.
Selecting a track loads the animation data into the graph.
Right-click on the track to access it’s context menu and export options.
Graph post-processing
Every recording starts with two empty graphs that help process and organize motion data into usable animation tracks. Currently active graph is displayed in the track-list.
Each graph can be saved as a prefab and additionally a default workflow prefab is available in the graph radial menu (right-click on the graph and prefabs).
We recommend spawning a default base prefab, it contains many comments how to use the system and adjusting it for your needs.
TheSwitch Graph option in the radial menu makes it easy to toggle between the post-processing and previewing graphs. (right-click on the graph)
Post processing graph (default)
To begin, each graph must contain anInput Data Node and aSave Animation Node, which can be created by right-clicking on the graph and selectingSpawn Node -> Storage.
Another way to create an input node is to drag a track from the track list directly onto the graph.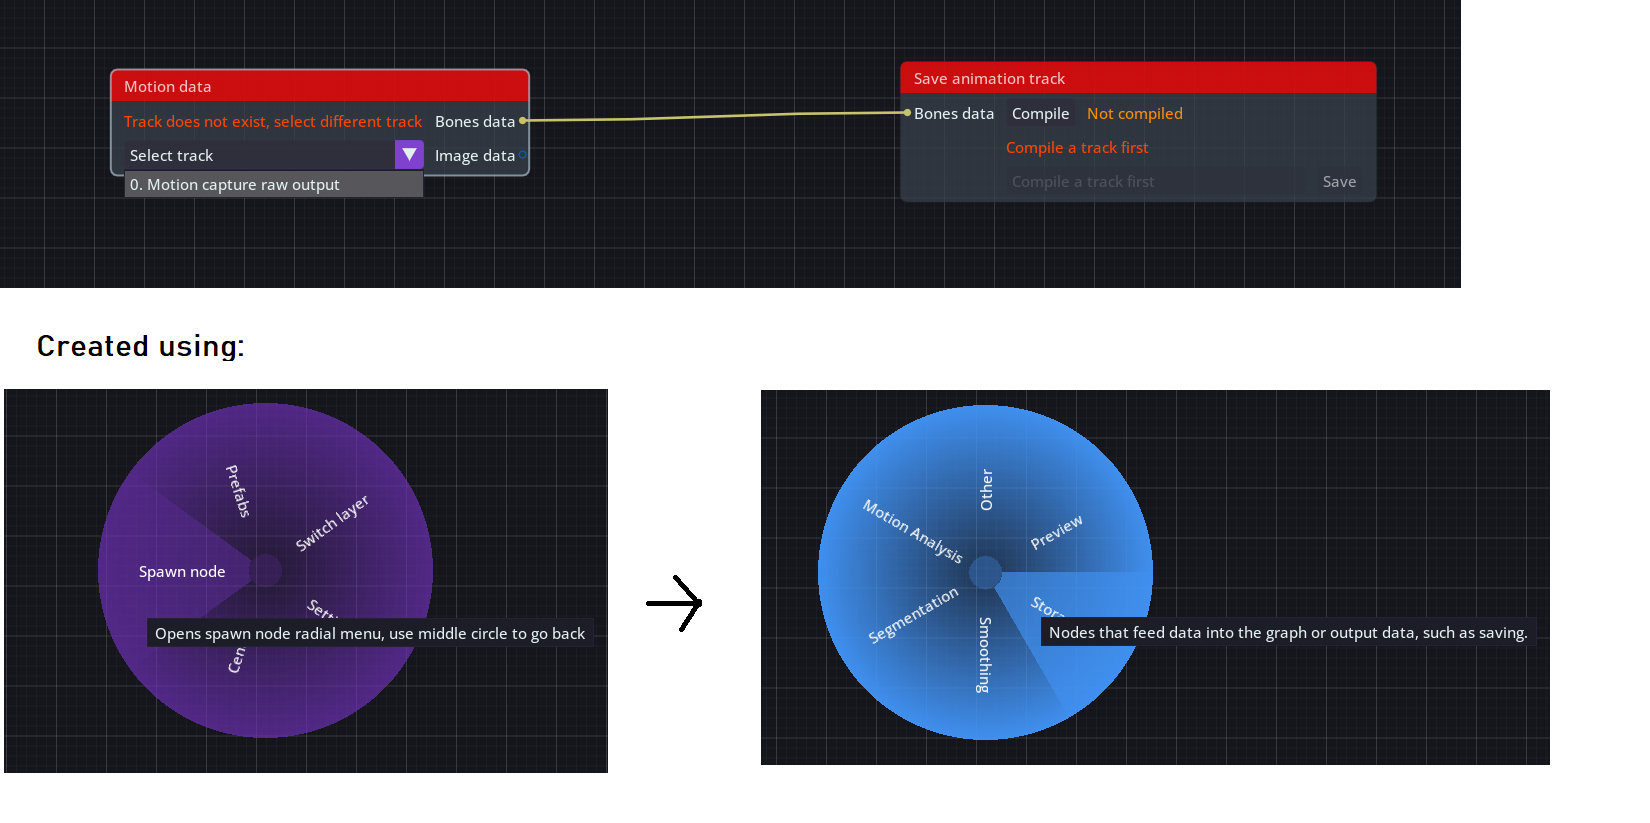
Once we have a track in the graph, we can perform both motion analysis and smoothing on the track.
Press ‘Compile’ on the Save Animation Node to compile current track, after which you can save the results under a name and preview it.
Many nodes are available for processing the data; (Right-click -> Spawn Node -> [ Category ] ). We recommend going over each to see what they offer, some but not all:
- Motion analysis nodes ( Detect leg movement which applies root motion to a character)
- Smoothing algorithm nodes ( Smooth the raw data )
- Lerping algorithms for bones ( Retain certain poses across frames, e.g. hand pose )
- Utility nodes which help you trim tracks, separate hands and body into two unique tracks that can be smoothed individually and then merged together.
Nodes from the Motion Analysis category require anImageData input pin and must always be applied before any smoothing operations.
One of the most important nodes in this category isDetect Leg Movement, which applies root motion based on 2D image data.
A standard workflow for processing motion data follows these steps:
- Drag a track onto the graph to create an input node (or spawn from radial menu)
- UseDetect Leg Movement to analyze movement, and if necessary,Anchor Bones to stabilize specific parts of the track.
- Split the track into separatebody andhand tracks.
- Apply smoothing to each track:
1) For body movement, a single smoothing node is often enough. Exponential Smoothing orLow-Pass Filtering are commonly used.
2) For hand motion, window-based smoothing nodes such as Spline Filling orPolynomial Smoothing work well. Starting with low parameters, large window sizes, and low curve values helps avoid unwanted artifacts.
3) If artifacts appear, reduce the curve value of the smoothing nodes that expose a curve and a window parameters. Generally play with the parameters of the node.
4) After the initial smoothing, a final pass with a Low-Pass Filter orExponential Smoothing further stabilizes hand motion
5) Possibly use either Interpolate or Fix bones task to either freeze entire pose or particular bones
- Switch to Previewing Graph (see below)
To enter this graph right-click on a graph and select 'Switch Layer' option.
This graph is in charge of preparing our smoothed animation for the targeting engine and optionally off-set bones in the currently previewed animation.After adjustments in this graph, our animation is ready to be exported ( right click on the track in the track-list and select export option. Track has to be previewed! ) or streamed to connected integration ( simply play the animation ).
Some of the nodes in this graph include:
- Apply Z curve ( root motion based on a distance to a camera, requires a recording with calibration file ), the z curve is available for edit in the curve editor.
- Correcting rotation of entire animation
- Scaling the animation ( if your coordinate system requires it )
- Swapping the animation axis to match targeting engine
- Applying offset to specific bones across multiple frames
Basic Workflow

And that’s it! You have a set of roughly 77 bones available for you (and a few virtual ones).
You can export it via file (FBX/BVH) by right-clicking on the track in the track-list )or stream it to connected integrations (play the animation and the data will be streamed).
Use this motion capture data and pipe it through your engine IK systems to drive your rigs using your existing tools that you know.
For Unreal Engine users the live link project contains a base retargeting rig that you can adjust to your own.
About tasks
You can hover each task on the graph for more information about the algorithm and what it does, as well as each input that it exposes.
In the future, this list will contain all tasks and even more in-depth explanation.
This task allows you to modify the playback speed and timing of your animation by:
1. Stretching or compressing a range of frames
2. Freezing a specific pose
3. Removing frames
== Basic Usage ==
Select a range of frames (From, To) and specify the desired Target Length.
- Original frames in the selected range will be replaced with interpolated frames
- Animation before and after the modified range remains unchanged
- Setting different From/To values with Target Length > 0 creates smooth interpolation
== Special Operations ==
FREEZING A POSE:
- Set From and To to the same frame number (e.g., From=10, To=10)
- Set Target Length to how many frames you want the pose held
- Example: From=10, To=10, Target Length=30 will hold frame 10's pose for 30 frames
REMOVING FRAMES:
- Select the range of frames to remove using From and To
- Set Target Length to 0
- Example: From=10, To=20, Target Length=0 will remove frames 10-20
== Tips ==
• Preview the result before applying to ensure proper timing
• For smooth transitions, avoid extreme compression ratios
• When freezing poses, choose a frame where the motion is stable
• Frame removal cannot be undone - consider saving a backup
